There’s something incredibly satisfying about making your own bread at home. Whether you’re a seasoned baker or just starting out, Middle Eastern pita bread is one of the easiest and most rewarding recipes to try.
Picture this: warm, soft pockets of pita fresh from the oven, ready to be filled with savory ingredients or enjoyed plain as a side dish.
With just a few simple steps and ingredients, you can recreate authentic Middle Eastern flavors right in your kitchen. In this article, we’ll explore why homemade pita bread is worth the effort, how it compares to store-bought options, tips for perfecting your technique, and even creative ways to enjoy this versatile flatbread.
Why Make Your Own Pita Bread?
Homemade pita bread isn’t just about convenience—it’s also healthier, tastier, and more affordable than buying pre-made versions.
Store-bought pitas often contain preservatives and additives that compromise their flavor and nutritional value. By making your own, you have complete control over what goes into your dough. Plus, there’s an undeniable charm in kneading the dough by hand and watching it puff up on the stovetop or in the oven.
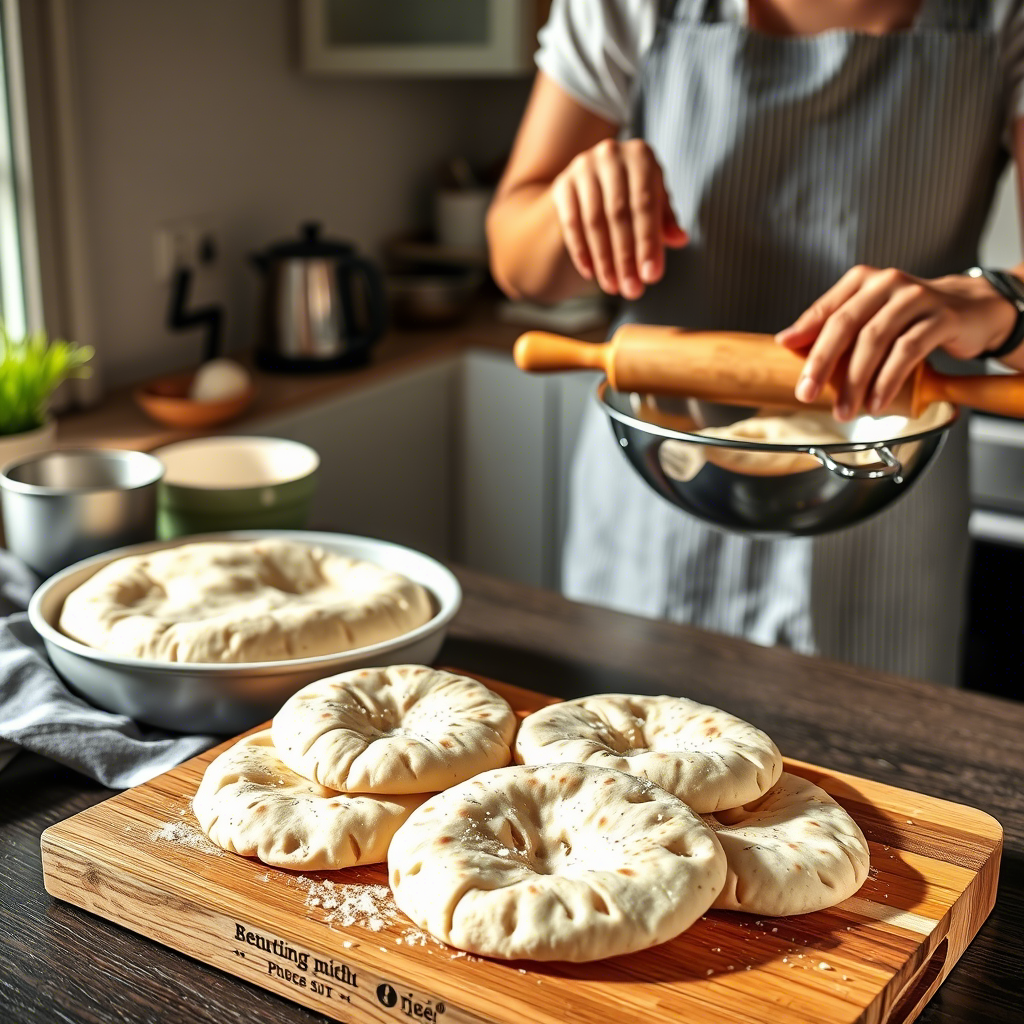
Making pita bread is surprisingly straightforward. You only need basic pantry staples like flour, water, yeast, salt, and olive oil.
The process itself requires minimal equipment—just a mixing bowl, rolling pin, and either a skillet or oven. For those who think baking is intimidating, rest assured that pita bread doesn’t require hours of rising time or complicated techniques. In fact, most recipes are ready within 30 minutes!
Beyond its simplicity, homemade pita has a texture and taste that far surpasses anything you could buy in a package. Its light, airy interior and slightly crispy exterior make it ideal for sandwiches, wraps, or dipping into hummus.
So, whether you’re hosting a dinner party or looking for a quick weeknight meal, homemade pita bread adds a touch of authenticity and warmth to any occasion.
Ingredients and Tools: What You Need
Before diving into the recipe, let’s break down the essential components of pita bread. Here’s a list of ingredients and tools you’ll need:
Ingredients:
- All-purpose flour (or whole wheat flour for a healthier option)
- Active dry yeast
- Warm water (around 110°F/45°C)
- Salt
- Olive oil
- Cornmeal (optional, for dusting)
Tools:
- Mixing bowl
- Measuring cups and spoons
- Rolling pin
- Non-stick skillet or baking sheet
- Oven or stovetop
Each ingredient plays a crucial role in achieving the perfect pita. For instance, using warm water activates the yeast, which helps the dough rise and creates those signature air pockets.
Similarly, adding a bit of olive oil enhances the texture and prevents the bread from becoming too dry. If you don’t have all these tools, don’t worry—you can adapt the method based on what you have available.
Now that we’ve covered the basics, let’s move on to some practical tips for success.
Tips for Perfect Pita Bread Every Time
Even though pita bread is relatively easy to make, a few tricks can take your results from good to great. First, pay close attention to the temperature of your water when activating the yeast. Water that’s too hot will kill the yeast, while water that’s too cold won’t activate it properly. A thermometer can help ensure consistency, but if you don’t have one, test the water with your finger—it should feel comfortably warm, not scalding.
Another key factor is rolling the dough evenly. Uneven thickness can lead to uneven cooking, so take your time with the rolling pin. Aim for circles about ⅛ inch thick. Additionally, avoid overcrowding your pan or oven when cooking the pitas. Each piece needs space to expand fully without sticking to others.
Finally, consider experimenting with different flours to change the flavor profile. Whole wheat flour, for example, gives the bread a nuttier taste and denser texture, while all-purpose flour ensures a lighter result. Don’t be afraid to mix things up until you find your favorite combination!
Comparing Homemade vs. Store-Bought Pita Bread
While store-bought pita bread might seem convenient, it simply can’t compete with the freshness and quality of homemade versions. Pre-packaged pitas tend to lose moisture quickly, leaving them tough and less appealing.
They may also lack the distinct aroma and flavor of freshly baked bread. Moreover, many commercial brands use artificial ingredients to extend shelf life, which can detract from the overall experience.
On the other hand, homemade pita bread offers unmatched flexibility. You can tailor the size, thickness, and seasoning according to your preferences. Feeling adventurous? Try sprinkling herbs like thyme or oregano onto the dough before cooking for an extra burst of flavor. Or add a pinch of za’atar, a traditional Middle Eastern spice blend, for a truly authentic touch.
If saving money is important to you, keep in mind that homemade pita bread costs significantly less per loaf compared to purchasing it from the grocery store. Over time, this small difference adds up, especially if you bake regularly.
Creative Ways to Enjoy Pita Bread
Once you’ve mastered the art of making pita bread, the possibilities for enjoying it are endless. Of course, classic fillings like falafel, shawarma, and tabbouleh remain timeless favorites. But why stop there? Get inspired by global cuisines and try unconventional combinations:
- Breakfast Wraps: Stuff your pita with scrambled eggs, avocado slices, and feta cheese for a hearty morning treat.
- Pizza Pitas: Top cooked pitas with marinara sauce, mozzarella, and your choice of toppings for a fun twist on pizza night.
- Dessert Pitas: Spread honey or Nutella inside and toast lightly for a sweet indulgence.
You can also cut the pita into wedges and serve them alongside dips such as baba ganoush, tzatziki, or muhammara. These bite-sized pieces make excellent appetizers or snacks during gatherings.
Embrace the Joy of Baking
At its core, baking pita bread is more than just creating food—it’s about connecting with tradition and culture. For centuries, Middle Eastern families have gathered around the table to share meals centered around fresh, homemade bread.
By learning to make pita yourself, you become part of this rich heritage. Not only does it bring people together, but it also fosters creativity and pride in your culinary skills.
As you experiment with new techniques and flavors, remember that mistakes are part of the journey. If your first batch doesn’t turn out perfectly, don’t get discouraged! Each attempt brings you closer to mastering the craft. And once you achieve that golden, puffed-up pita, you’ll know exactly why it’s worth the effort.
Conclusion
Making Middle Eastern pita bread at home is a delightful way to elevate your meals while embracing cultural traditions. From selecting high-quality ingredients to applying simple yet effective techniques, every step contributes to a delicious outcome.
Whether you’re serving it as a side dish, turning it into a sandwich, or transforming it into dessert, pita bread proves itself endlessly versatile.
So why wait? Gather your supplies, roll up your sleeves, and give it a try. Share your creations with loved ones and inspire others to join in the fun.
Who knows—you might discover a hidden passion for baking along the way! Let us know in the comments below how your pita turned out, or tag us on social media with your photos. Happy baking!

Thayná Alves is an influential digital content creator who has carved out a significant space in the realms of technology, finance, and entrepreneurship. Through her blog, Newbacker.com , she stands out as an authentic and accessible voice for individuals seeking practical information about investments, innovation, and emerging trends in the financial market.
