Imagine biting into a warm, buttery croissant — that first crisp crunch, followed by tender, airy layers that melt delicately on your tongue. It’s not magic. It’s laminated dough. And while it might look like something only professional bakers in Parisian patisseries can master, the truth is — you can do it too. Right in your own kitchen.
Laminating pastry isn’t just for croissants. It’s the secret behind puff pastry, Danish pastries, kouign-amann, and even some savory delights like cheese straws or beef Wellington. At its core, lamination is the art of folding butter into dough to create hundreds of paper-thin layers that puff up beautifully in the oven. It’s science, patience, and a little bit of love — all rolled into one.
In this guide, we’ll walk you through everything you need to know to master pastry lamination — from choosing the right butter to troubleshooting common mistakes. Whether you’re a weekend baker looking to impress or someone who just wants to understand why your homemade croissants didn’t quite “croissant,” this step-by-step breakdown will set you up for buttery, flaky success.
Ready to roll? Let’s dive in.
1. What Is Laminated Dough — And Why Does It Matter?
Before you start rolling and folding, let’s get one thing straight: laminated dough isn’t just “dough with butter.” It’s a carefully engineered structure — a symphony of gluten, fat, and steam.
At its simplest, lamination means enclosing a block of cold butter inside a basic dough (called détrempe in French), then repeatedly folding and rolling it to create alternating layers of dough and butter. When baked, the water in the butter turns to steam, forcing those layers apart — resulting in that signature flakiness we all crave.
Why does this matter? Because texture is everything in pastry. A muffin can be dense. A cookie can be chewy. But laminated pastries? They must be light, crisp, and layered. That’s their identity. Skip the lamination, and you’re left with… well, bread. Tasty bread, maybe — but not pastry.
Think of it like building a skyscraper. Each layer is a floor. If one floor is uneven or collapses, the whole structure suffers. In lamination, every fold must be precise, every chill must be respected, and every roll must be even. Mess up one step, and your layers won’t puff. Get it right? You’ll have pastries that rival your favorite bakery.
And here’s the good news: once you understand the why, the how becomes so much easier.
2. Choosing Your Butter: Not All Fats Are Created Equal
Let’s be real — butter is the star of the show. In laminated dough, it’s not just flavor. It’s architecture.
You might be tempted to grab whatever’s in your fridge — but hold on. For lamination, you need high-fat, European-style butter (82-84% fat content). Why? Because American-style butter (usually 80% fat) contains more water. More water = more steam = more risk of your layers fusing together or your butter leaking out during baking.
European butter — like Plugrá, Kerrygold, or President — has less water and more fat, which means it stays firmer when cold and melts more evenly in the oven. That’s crucial for clean, defined layers.
Pro Tip: If you can’t find European butter, don’t panic. You can still use regular butter — just chill it longer before laminating and handle it more gently. But for your first few attempts, splurge on the good stuff. Trust me, your croissants will thank you.
Also — no margarine. No shortening. No “I-thought-this-would-work” substitutes. Butter is non-negotiable here. Its flavor, its melting point, its water content — all are perfectly calibrated for lamination. Anything else? You’re baking on hard mode.
One more thing: temperature matters. Your butter must be cold — but not rock-hard. You want it pliable enough to roll without cracking, but firm enough to hold its shape. Think “cold clay,” not “ice cube.” We’ll talk more about this in the next section.
3. The Dough: Simple Ingredients, Big Responsibility
Your dough — or détrempe — is the foundation. It doesn’t need fancy ingredients. Just flour, water, salt, a little sugar (for flavor and browning), and sometimes yeast (if you’re making croissants or Danish).
But here’s the catch: this dough must be strong enough to hold layers, yet tender enough to bake into delicate flakes. That means gluten development is key — but not too much.
Here’s what you need to know:
- Flour: Use bread flour (12-14% protein). It gives you the gluten strength to withstand all that rolling and folding without tearing. All-purpose can work in a pinch, but your layers might not hold up as well.
- Hydration: Keep it moderate — around 50-55%. Too wet, and the dough will be sticky and hard to handle. Too dry, and it’ll crack during lamination.
- Mixing: Mix just until the dough comes together. You’re not making bread — you don’t want full gluten development yet. That happens during the folds.
- Resting: After mixing, let the dough rest in the fridge for at least 1 hour (preferably 2). This relaxes the gluten and firms up the dough, making it easier to roll around the butter.
Think of your dough like a gentle hug — it needs to embrace the butter without squeezing too tight. Too much tension, and it’ll fight you during rolling. Too little, and the butter will escape. The resting period? That’s your dough’s yoga class. It’s chilling out, getting ready for the hard work ahead.
4. The Butter Block: Shaping Your Golden Treasure
Now comes the fun part — shaping your butter into a perfect rectangle. This is called the beurrage (say: buh-RAHZH), and it’s where many bakers slip up.
Here’s how to do it right:
- Cut cold butter into ½-inch slices. Lay them side by side on a large piece of parchment paper, forming a rough rectangle.
- Cover with another sheet of parchment. Use your rolling pin to gently pound and roll the butter into a smooth, even block — about 7×8 inches. Don’t press too hard or the butter will ooze out the sides. Gentle, even pressure is key.
- Chill again. Pop it back in the fridge for 20-30 minutes. You want it cold but bendable — like cold modeling clay.
Why go through all this trouble? Because if your butter block is uneven, your layers will be too. Thick spots = uneven puffing. Thin spots = butter leakage. And nobody wants sad, greasy pastries.
Visual Tip: Your butter block should be about 2/3 the size of your rolled-out dough. That way, when you encase it, the dough fully seals the edges without stretching too thin.
Still nervous? Try this: after shaping your butter, press your finger into it. If it leaves a slight dent but doesn’t crack or ooze — you’re golden. Literally.
5. The Enclosure: Wrapping Butter Like a Present
Now it’s time to marry dough and butter. This step is called enclosing or locking in the butter — and it’s where the magic truly begins.
Roll your rested dough into a rectangle — about 10×15 inches. Place your chilled butter block diagonally in the center, like a diamond. Then, fold the corners of the dough over the butter, like you’re wrapping a present. Pinch the seams tightly to seal.
Why seal it so well? Because during rolling, any exposed butter will squish out — and once it’s out, it’s gone. No butter = no layers. Plus, escaped butter can stick to your counter, your pin, your sanity…
Pro Tip: Dust your surface and pin lightly with flour — but not too much. Excess flour gets incorporated into the dough and can dry it out or interfere with layer formation.
Once sealed, give the dough a quarter turn so the seam is on your right (like a book spine). This helps you keep track of your folds later. Then, gently roll it out into a long rectangle — about 8×20 inches. Don’t force it. If the butter starts to ooze or crack, stop and chill it for 15 minutes.
Patience isn’t just a virtue here — it’s a requirement.
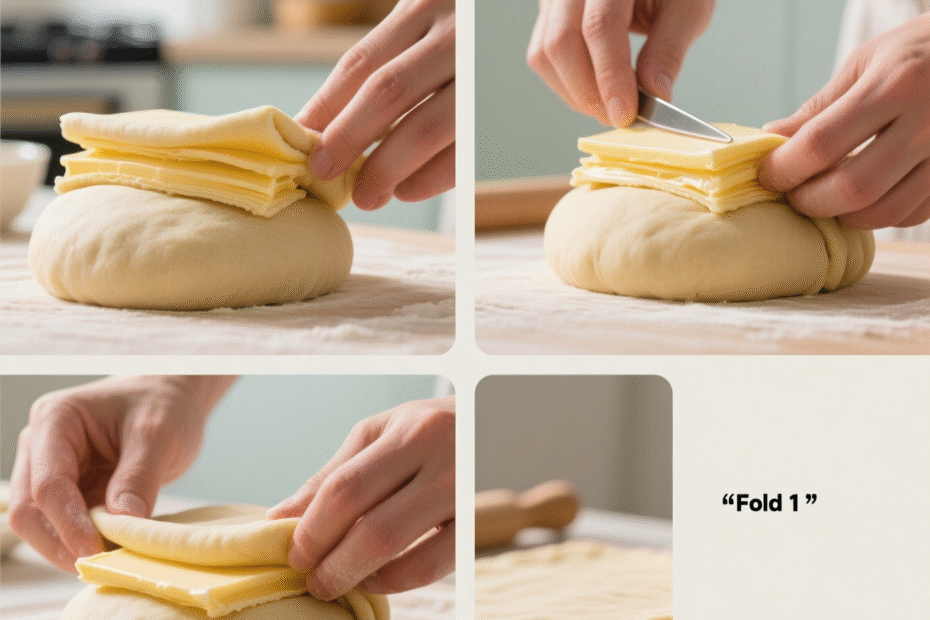
6. Folding Techniques: Letters, Books, and Layers
Folding is where the layers multiply. There are two main types: the single fold (also called a letter fold) and the double fold (or book fold).
- Single Fold (Letter Fold): Fold the dough like a business letter — bottom third up, top third down. This creates 3 layers.
- Double Fold (Book Fold): Fold both ends to the center, then close like a book. This creates 4 layers.
Most recipes use a combination. For croissants, it’s typically 1 single fold + 2 double folds (or 2 singles + 1 double). That gives you 3 x 4 x 4 = 48 layers — or 3 x 3 x 4 = 36 layers. Sounds like math class? It kind of is. But delicious.
Here’s the golden rule: Chill between every fold.
After each fold, wrap the dough and refrigerate for at least 30 minutes. Why? Because:
- The butter needs to re-firm.
- The gluten needs to relax.
- You need a coffee break. (Okay, maybe that last one’s optional.)
Skipping the chill? That’s how you get butter bursting through dough, layers sticking together, and tears — both in the pastry and on your face.
7. Rolling and Tuning: The Dance of Precision
Rolling laminated dough is like dancing with a very cold, very slippery partner. You need rhythm, control, and a little grace.
Always roll from the center outward — never back and forth like you’re punishing the dough. Use even pressure. Rotate the dough 90 degrees after each roll to maintain an even rectangle.
Keep the edges neat. If they get ragged, trim them slightly with a knife. Ragged edges mean uneven layers — and uneven layers mean uneven baking.
And here’s a secret most bakers won’t tell you: your final dough thickness matters. For croissants, aim for ¼ inch. Too thick? They won’t cook through. Too thin? They’ll dry out and lose structure.
Use a ruler. Seriously. Pastry is part science. Embrace it.
8. Cutting and Shaping: Where Personality Meets Precision
Once your dough is laminated and rested, it’s time to cut and shape. This is where you get creative — but not too creative.
For croissants: cut triangles. Roll them up gently, stretching the tip slightly as you go. Curve the ends for that classic crescent shape.
For pain au chocolat: cut rectangles. Place chocolate batons on one end, fold over, then fold again.
For puff pastry squares: cut even rectangles or squares. No shaping needed — just bake and watch them puff.
Key Tip: Always use a sharp knife or pastry wheel. Dull blades compress the layers and ruin the rise. And never twist the knife — lift straight up.
Also — handle the dough as little as possible. Warm hands = melted butter = sad layers. If your kitchen is hot, work fast and chill shaped pastries before baking.
9. Proofing: The Quiet Miracle Before the Oven
Proofing is where your laminated dough comes alive — especially if it’s yeasted (like croissants or Danish).
You want a warm (75-78°F), humid environment. Too cold? The yeast sleeps. Too hot? The butter melts. Either way — disaster.
Signs your croissants are proofed:
- They’ve doubled in size.
- They wiggle slightly when you shake the tray.
- They feel puffy and delicate — not dense.
Underproofed? Dense, tight layers. Overproofed? Butter leaks, structure collapses.
No proofing box? No problem. Turn your oven light on, place a pan of hot water on the bottom rack, and let the pastries rise inside. Just don’t forget and turn the oven on. (Yes, people have done it.)
10. Baking: The Grand Finale
Preheat your oven — and I mean really preheat it. 375-400°F is ideal for most laminated pastries. You want a blast of heat to create instant steam and lift.
Bake until deeply golden — not just “lightly tan.” Underbaked laminated dough is gummy and sad. Properly baked? Crisp, flaky, glorious.
Pro Tips:
- Egg wash is your friend. It adds shine and helps with browning. Just don’t let it drip down the sides — it can glue layers together.
- Rotate the tray halfway through for even baking.
- Let pastries cool slightly before eating. The layers need a minute to set. (I know, I know — waiting is torture.)
11. Troubleshooting: Why Your Layers Didn’t Happen
Even the best bakers have off days. Here’s what went wrong — and how to fix it:
🔹 Butter leaked out? Dough was too warm or butter too soft. Chill longer next time.
🔹 Layers didn’t puff? Butter was too cold and shattered, or dough was overworked. Aim for pliable, not icy.
🔹 Dense, bready texture? Underproofed or not enough folds. Give the yeast time, and don’t skip folds.
🔹 Burnt bottoms? Bake on a higher rack or use a double pan to insulate.
🔹 Uneven rise? Dough wasn’t rolled evenly. Use a ruler. I’m not kidding.
Keep a baking journal. Note what worked, what didn’t. Lamination is a skill — and like any skill, it gets better with practice.
12. Beyond Croissants: Where Lamination Can Take You
Once you’ve mastered the basics, the world of laminated dough opens wide.
Try:
- Kouign-amann — laminated dough + loads of sugar = caramelized, buttery bliss.
- Cruffins — croissant + muffin = hybrid genius.
- Savory pinwheels — fill with cheese, ham, pesto.
- Palmiers — just sugar and folds. Simple. Stunning.
- Napoleons — layered with pastry cream. Elegant. Decadent.
Lamination isn’t a technique — it’s a superpower. One you now possess.
Conclusion: Your Kitchen, Your Patisserie
You made it. From flour and butter to flaky, golden layers — you now hold the secrets of lamination in your hands (and rolling pin).
This isn’t just about baking. It’s about patience. Precision. The joy of creating something beautiful with your own two hands. Every fold, every chill, every anxious peek into the oven — it’s all part of the journey. And the reward? A tray of pastries that make people stop, stare, and say, “You MADE these?”
Yes. You did.
Don’t be discouraged by imperfect first attempts. Even the best bakers started with leaky butter and sad croissants. What matters is that you tried. That you learned. That you’re willing to roll out that dough one more time.
So go ahead — preheat that oven. Unwrap that butter. Flour your counter. Your own little patisserie is waiting.
And when you pull out that first perfect, flaky, golden croissant?
Take a bite. Close your eyes. Smile.
You’ve earned it.
Now it’s your turn!
👉 What was your biggest laminating disaster — and how did you fix it?
👉 Tag a friend who needs to try this.
👉 Save this guide for your next baking day — and don’t forget to share your results!
Happy baking, layer-maker. 🥐✨

Thayná Alves is an influential digital content creator who has carved out a significant space in the realms of technology, finance, and entrepreneurship. Through her blog, Newbacker.com , she stands out as an authentic and accessible voice for individuals seeking practical information about investments, innovation, and emerging trends in the financial market.