The smell of buttery pastry wafting through the kitchen is enough to make anyone’s childhood nostalgia kick into high gear. While we all have memories of grabbing a silver foil pouch from the pantry on a busy morning, there is a world of difference between a factory-pressed cracker and a flaky, hand-crimped pastry filled with real fruit.
In this guide, we are going to dive deep into the art of the homemade toaster pastry. We will explore why the “made from scratch” version wins every single time, the secrets to a crust that actually melts in your mouth, and how you can customize your fillings to suit your wildest cravings. Whether you are a seasoned baker or a kitchen novice, you are about to discover that perfection is found right in your own oven.
Why Homemade Always Beats the Box
There is a specific kind of magic that happens when you take control of your ingredients. When you look at the back of a store-bought box, the list of preservatives and high-fructose corn syrup can be a bit overwhelming. By making them at home, you are choosing high-quality butter, organic flour, and real fruit preserves. This isn’t just about health; it’s about flavor profile and texture.
Store-bought pastries are designed for shelf-life, which often means they are dry and a bit chalky. A homemade version, however, utilizes a shortcrust pastry that is rich and tender. When you take that first bite, you get a distinct “snap” followed by layers of buttery goodness that a machine simply cannot replicate.
Furthermore, the emotional connection to food is amplified when you put in the effort. Serving a warm, glazed pastry to your family on a Saturday morning creates a memory that a cardboard box never could. It turns a quick snack into an event, making the kitchen the heart of the home once again.
The Secret to the Perfect Flaky Crust
The foundation of any great Pop-Tart is the crust. To achieve that iconic flaky texture, you need to treat the dough with a little bit of respect. The secret lies in cold fats. Using chilled butter (and perhaps a touch of shortening) ensures that tiny pockets of fat remain intact within the flour. When the heat of the oven hits those pockets, the water evaporates, creating steam that lifts the dough into beautiful layers.
Many people make the mistake of overworking their dough. If you handle it too much, the heat from your hands melts the butter and develops the gluten, leading to a tough, bready result. Instead, aim for a “shaggy” dough. It might look a little messy at first, but that’s exactly what you want for a pastry that shatters delicately when bitten.
Pro-Tip for Success:
-
Chill your flour: Put your dry ingredients in the fridge for 20 minutes before starting.
-
Use ice water: Only add water a tablespoon at a time until the dough just holds together.
-
Resting is key: Let your dough sit in the fridge for at least an hour before rolling it out.
By following these simple steps, you ensure that your base is sturdy enough to hold the filling but light enough to feel like a gourmet dessert. It’s the difference between a snack and a masterpiece.
Elevating Your Filling: Beyond Basic Strawberry
While strawberry and brown sugar cinnamon are the undisputed kings of the toaster pastry world, going homemade allows you to experiment with gourmet flavor combinations. Why settle for artificial jelly when you can use roasted balsamic strawberries or a thick lemon curd? The filling is where you can truly let your personality shine.
The key to a successful filling is thickness. If your jam is too watery, it will soak into the bottom crust or leak out the sides during baking. You want a “jammy” consistency—something that stays put. You can even thicken store-bought preserves by simmering them on the stove with a small cornstarch slurry for a few minutes.
Consider these creative combinations for your next batch:
-
Savory Morning: Bacon jam and sharp cheddar cheese.
-
The Elvis: Peanut butter, honey, and mashed banana.
-
Winter Warmth: Spiced apple butter with a maple glaze.
-
Dark Forest: Cherry preserves with dark chocolate shavings.
Transitions are easy here: once you’ve mastered the filling, you’re only one step away from the final “look”—the glaze. Just as the filling provides the soul of the pastry, the glaze provides the personality and that classic sugary crunch we all crave.
Assembly and the Art of the Crimp
Putting your Pop-Tarts together is a bit like a craft project. You’ll want to roll your dough into a large rectangle and cut out even smaller rectangles. Consistency is your friend here; if they are all the same size, they will bake evenly. A simple ruler can be your best tool in the kitchen for this specific task.
Once you’ve placed your filling in the center of a dough sheet, the “egg wash” becomes your best friend. Acting as a culinary glue, a light brush of beaten egg around the edges ensures the top layer stays attached. Then comes the most satisfying part: the crimping. Using the tines of a fork to press the edges together doesn’t just look professional; it creates a structural seal that prevents “filling blowouts.”
Don’t forget to prick the top of each pastry a few times with your fork! These vent holes allow steam to escape, preventing your tarts from puffing up like pillows and keeping them flat and crisp. It’s these small, technical details that elevate your baking from “amateur” to “artisan.” After a quick 20-minute bake at 375°F (190°C), you’ll see the edges turn a beautiful golden brown.
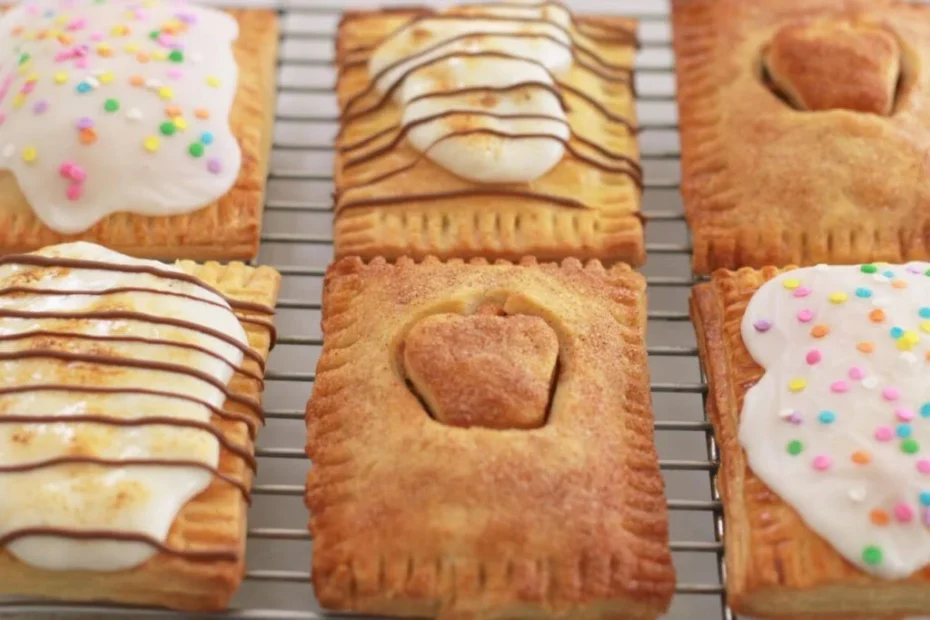
Finishing Touches: Glazing Like a Pro
A Pop-Tart isn’t truly finished until it’s dressed in a coat of sweet, colorful icing. The classic glaze is a simple mixture of powdered sugar, a splash of milk, and vanilla extract. However, for that authentic “hard” icing that doesn’t melt off the second you touch it, adding a tiny bit of corn syrup or melted butter can give it a professional sheen and stability.
This is also the part where you can get the whole family involved. Adding natural food colorings or a handful of sprinkles makes the process fun and visually stunning. If you’re making the Brown Sugar Cinnamon variety, a pinch of cinnamon in the glaze adds that extra punch of spice that lingers on the palate.
Why the glaze matters:
-
Texture Contrast: It adds a crunch to the soft pastry.
-
Visual Appeal: We eat with our eyes first!
-
Flavor Seal: It locks in the moisture of the crust underneath.
As you spread that final layer of icing, you’ll realize that these don’t just look like the ones from the store—they look better. They have character, they have weight, and they have an aroma that no processed food could ever hope to match.
Conclusion: A New Morning Tradition
Making homemade Pop-Tarts is more than just a baking project; it’s an act of reclaiming a classic snack and making it something truly special. We’ve explored the importance of a buttery, cold-fat crust, the endless possibilities of custom fillings, and the simple techniques that ensure your pastries look as good as they taste.
By stepping away from the processed aisle and into your own kitchen, you are choosing quality, creativity, and flavor. These treats are perfect for freezing and reheating, meaning you can have a “gourmet morning” even on a Tuesday.
Now it’s your turn to take the plunge! Put on your apron, grab your rolling pin, and start experimenting. Once you taste the difference of a hand-crimped, fresh-baked pastry, you’ll never look at the boxed version the same way again.
What was your favorite Pop-Tart flavor growing up? Tell us in the comments below, or share a photo of your homemade creations with us!

Thayná Alves is an influential digital content creator who has carved out a significant space in the realms of technology, finance, and entrepreneurship. Through her blog, Newbacker.com , she stands out as an authentic and accessible voice for individuals seeking practical information about investments, innovation, and emerging trends in the financial market.