Nothing beats the intoxicating aroma of freshly baked bread wafting through your kitchen, except perhaps the sound of a crackling, golden crust as it cools on the counter. While many believe that artisan-style bread requires expensive steam-injection ovens or specialized Dutch ovens, the secret to a world-class loaf might already be sitting in your kitchen cabinet: the cast iron skillet.
In this comprehensive guide, we will dive deep into the art of skillet baking. We’ll explore why cast iron is a baker’s best friend, walk through the essential science of heat retention, and provide a foolproof method for creating a rustic loaf at home. Whether you are a seasoned baker or a total novice, this article will show you how to leverage this heavy-duty tool to elevate your baking game.
By the end of this journey, you won’t just have a recipe; you’ll have the confidence to turn your kitchen into a professional-grade bakery. Let’s get our hands floury and discover why the skillet is the ultimate vessel for the perfect crust.
1. The Magic of Cast Iron: Why It Outperforms the Rest
When it comes to baking bread, heat management is everything. Most home ovens suffer from fluctuating temperatures and cold spots, which can lead to uneven rising. Cast iron is a game-changer because of its incredible thermal mass. Once a skillet gets hot, it stays hot, radiating steady, intense heat directly into the dough from all angles.
Think of a cast iron skillet as a battery for heat. In a standard thin baking sheet, the temperature drops the moment you open the oven door. A skillet, however, acts as a heat reservoir. This constant temperature encourages “oven spring”—that magical moment in the first few minutes of baking where the yeast gives its final burst and the bread expands rapidly before the crust sets.
Furthermore, cast iron is virtually indestructible. Unlike non-stick pans that can peel or glass that can shatter under extreme heat, a seasoned skillet thrives in high-temperature environments. It provides a natural non-stick surface that improves with every loaf you bake, ensuring your bread slides out easily every time.
2. Preparing the Perfect Dough: Texture and Fermentation
Before the dough even touches the pan, the foundation of a great loaf is laid during the mixing and fermentation process. For skillet bread, a high-hydration dough (one with a relatively high water content) works best. The extra moisture creates steam inside the oven, which is essential for that airy, “holey” interior and a thin, crispy crust.
To implement this at home, try a “no-knead” approach. By mixing flour, water, salt, and a tiny amount of yeast, and letting it sit for 12 to 18 hours, you allow biology to do the work for you. Time develops the gluten strands that give bread its structure, saving you from tiring manual labor. This slow fermentation also unlocks complex flavors that quick-rising breads simply cannot match.
Practical Tips for Dough Preparation:
-
Use a scale: Measuring flour by volume (cups) is notoriously inaccurate. Measuring in grams ensures consistency every time.
-
Don’t rush the rise: If your kitchen is cold, let the dough rise in the oven with just the light turned on.
-
Watch the bubbles: A ready dough should be doubled in size and dotted with small carbon dioxide bubbles on the surface.
This patience pays off when you see the contrast between the soft, pillowy crumb and the rugged exterior. Once your dough is fermented and bubbly, it’s time to prepare the skillet for the main event.
3. Preheating and Steaming: The Secret to Professional Crust
If you’ve ever wondered why bakery bread has that shiny, crackly crust while home bread often looks dull and leathery, the answer is steam. In the professional world, ovens inject steam to keep the surface of the dough moist. This allows the bread to expand fully and caramelizes the sugars in the flour.
Using a cast iron skillet allows you to mimic this environment beautifully. An old trick is to preheat your skillet inside the oven at 450°F (230°C) for at least 30 minutes. When the cold dough hits the searing hot iron, it gets an immediate heat shock. To create steam, you can place a second shallow pan on the rack below and pour in a cup of hot water right as you slide the bread in.
Analogies for Understanding Steam: Imagine trying to blow up a balloon that has a layer of dried glue on the outside—it would pop or stay small. Steam is like keeping the “glue” wet; it keeps the dough surface flexible so the bread can grow as large as possible. Once the steam evaporates, the dry heat takes over to turn that skin into a golden, crunchy shell.
This transition from a moist environment to a dry, searing heat is the “magic formula” for artisan bread. Without the skillet’s ability to hold and radiate that heat, the steam wouldn’t be as effective, and your crust would lack that signature “crunch.”
4. Step-by-Step: From Pan to Plate
Now that we understand the science, let’s look at the practical workflow. Baking in a skillet requires a bit of bravery since you are dealing with very hot equipment, but the process is straightforward once you find your rhythm.
The Skillet Baking Workflow:
-
Preheat: Place your 10 or 12-inch skillet in the oven and turn it to 450°F.
-
Shape: Gently fold your dough into a round ball on a piece of parchment paper.
-
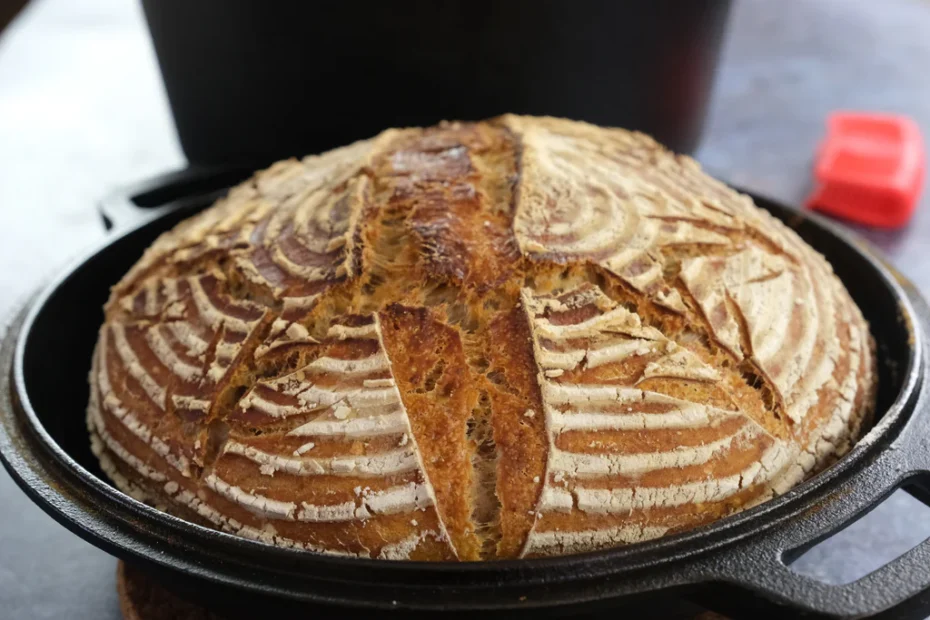
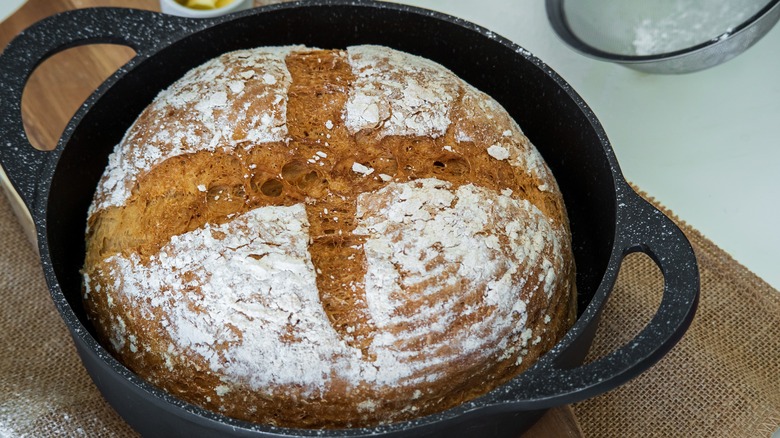
Score: Use a sharp knife or a razor blade to cut a deep “X” or a long slash across the top. This controls where the bread expands.
-
Load: Carefully lift the parchment paper and drop the dough (paper and all) into the hot skillet.
-
Bake: Bake for 25-30 minutes, then reduce the heat slightly if it’s browning too fast.
Pro-Tip: If you have a second cast iron skillet of the same size, you can flip it upside down and use it as a lid for the first 15 minutes of baking. This traps the dough’s own moisture, creating a “mini-oven” effect that produces an even better crust than the water-pan method alone.
Following this method ensures that the bottom of your loaf is just as crispy as the top. There is no risk of a “soggy bottom” when you are using cast iron, as the heat from the pan fries the exterior of the dough slightly, creating a delicious, almost fried-bread flavor on the base.
5. The Ritual of Breaking Bread: Beyond the Recipe
Baking bread in a cast iron skillet is more than just a culinary technique; it is a return to a more deliberate, tactile way of living. In our fast-paced world of pre-sliced, plastic-wrapped loaves filled with preservatives, taking the time to nurture a sourdough starter or wait for a slow-rise dough is an act of mindfulness.
The cast iron skillet itself is a symbol of longevity and tradition. Often passed down through generations, these pans carry the “seasoning” of thousands of meals. When you bake bread in one, you are participating in a ritual that spans centuries. There is something deeply satisfying about pulling a heavy, searing pan from the oven and seeing a rustic, hand-crafted loaf where there was only flour and water hours before.
As you wait for the bread to cool (the hardest part!), reflect on the simplicity of the ingredients. Flour, water, salt, and heat. That’s all it takes to create something that brings people together. This process teaches us that with the right tools and a bit of patience, we can create extraordinary things from the most basic elements.
Conclusion
Baking bread in a cast iron skillet is a rewarding journey that blends science, tradition, and sensory delight. We have explored how the skillet’s heat retention creates a superior crust, the importance of high-hydration dough, and the clever use of steam to achieve bakery-quality results at home. By following the preheating and scoring techniques discussed, you can turn a humble kitchen staple into a powerful artisan tool.
I encourage you to embrace the imperfections of your first few loaves. Perhaps the shape isn’t a perfect circle, or the crust is a bit darker than expected—these are the hallmarks of true handmade bread. The more you bake, the more you will “tune in” to your oven and your skillet, eventually developing a style that is uniquely yours.
So, why not start today? Dust off that skillet, mix up some dough, and experience the primal joy of baking your own bread. Your kitchen—and your taste buds—will thank you.
What is your favorite type of bread to pair with dinner, and are you ready to try making it in your skillet? Leave a comment below with your baking successes (or questions), and share this guide with a friend who loves the smell of fresh bread!

Thayná Alves is an influential digital content creator who has carved out a significant space in the realms of technology, finance, and entrepreneurship. Through her blog, Newbacker.com , she stands out as an authentic and accessible voice for individuals seeking practical information about investments, innovation, and emerging trends in the financial market.