There’s a moment every home baker dreams of: sliding a golden-brown loaf from the oven, hearing that satisfying crackle as the crust cools, then breaking through a shatteringly crisp exterior to reveal a tender, airy crumb within. That magical contrast doesn’t happen by accident—it starts with the right foundation beneath your dough. For artisan bread enthusiasts, that foundation is almost always a baking stone.
In this guide, we’ll explore why a simple slab of stone can transform your bread-baking results, how to navigate the different materials and styles available, and practical tips for getting professional-quality crusts in your home oven. Whether you’re baking your first sourdough or refining a years-long practice, understanding how to choose and use a baking stone will elevate your loaves from good to unforgettable. Let’s uncover the secrets hiding right beneath your dough.
Why a Baking Stone Makes All the Difference
Imagine your oven as a desert landscape. Without a baking stone, the air might be hot, but the surface beneath your loaf stays relatively cool—like stepping onto sun-warmed sand that gives way beneath your feet. Now picture that same desert with sun-baked stone underfoot: solid, intensely hot, and radiating stored energy. That’s the difference a baking stone creates.
When you place dough directly on a preheated stone, something remarkable happens instantly. The stone’s thermal mass—its ability to absorb and hold heat—delivers a powerful burst of energy to the bottom of your loaf. This rapid heat transfer causes the dough to expand dramatically in those first critical minutes, a phenomenon bakers call “oven spring.” More importantly, that intense bottom heat drives moisture from the dough’s surface quickly, creating the foundation for a crisp, complex crust.
Home ovens struggle with humidity control. Professional bakeries use steam injection to keep crusts flexible during early baking, allowing maximum expansion before the crust sets. A baking stone compensates for this limitation by creating its own microclimate. As moisture escapes the dough, it hits the scorching stone surface and instantly vaporizes, generating a brief burst of steam right where your loaf needs it most. The result? Better rise, more blistering on the crust, and that signature crackle we all crave.
Types of Baking Stones an Materials Compared
Not all baking stones are created equal. The material you choose affects heat retention, durability, and even how your bread bakes. Let’s break down the most common options you’ll encounter.
Cordierite stones dominate the artisan baking world for good reason. This mineral composite handles extreme temperature changes beautifully—critical when you slide cold dough onto a 450°F surface. Cordierite stones heat evenly, resist cracking, and develop a natural non-stick patina over time. Brands like FibraMent have become favorites among serious home bakers for their professional-grade performance. Expect to pay $40–$70 for a quality cordierite stone that will last years.
Unglazed ceramic tiles offer a budget-friendly alternative. Available at most hardware stores for under $20, these 12″x12″ quarry tiles work surprisingly well when arranged to cover your oven rack. They heat effectively but require careful handling—they’re more vulnerable to thermal shock if exposed to moisture while hot. Always place them in a cold oven and let them heat gradually.
Cast iron and steel represent an interesting hybrid approach. While not “stones” in the traditional sense, heavy cast iron griddles or baking steels (like the popular Baking Steel brand) excel at heat conduction. Steel transfers heat faster than stone, creating exceptional oven spring and a darker, crunchier bottom crust. The trade-off? Less thermal mass means they cool slightly when dough hits the surface, and they require seasoning to prevent sticking.
Avoid glazed ceramic stones or those marketed specifically for pizza without bread-baking reviews. Glazes can contain lead or other compounds unsafe at bread-baking temperatures, and pizza-focused stones often prioritize quick heating over the sustained thermal mass bread requires.
Size, Thickness, and Shape Considerations
Choosing the right dimensions matters more than you might think. A stone that’s too small fights against your oven’s natural heat circulation; one that’s too large risks cracking from uneven heating or blocking essential airflow.
Size guidelines: Your stone should sit comfortably on your oven rack with at least 1–2 inches of clearance on all sides. This gap allows hot air to circulate freely around the stone, preventing hot spots and ensuring even baking. For standard home ovens, a 14″x16″ stone usually fits well. If you bake multiple loaves or larger batards, consider a 16″x20″ stone—but measure your oven first! Nothing’s more frustrating than an expensive stone that won’t fit through your oven door.
Thickness sweet spot: Aim for ¾ inch to 1 inch of thickness. Thinner stones (½ inch) heat quickly but lack the thermal mass needed for proper oven spring—they cool too dramatically when dough makes contact. Stones thicker than 1½ inches take forever to preheat (sometimes 45+ minutes) and risk cracking from uneven internal heating. That ¾-inch to 1-inch range delivers the ideal balance: substantial heat retention without impractical preheating times.
Shape flexibility: Rectangular stones offer the most versatility for different loaf shapes. Round stones work fine for boules but limit your options. Some bakers invest in two smaller stones instead of one large one—this configuration allows flexible arrangement and reduces cracking risk. Just ensure the stones sit flat against each other without gaps where dough could sag during baking.
Remember: your stone will expand slightly when hot. Never place it directly on the oven floor or against oven walls—always use a rack with adequate clearance.
How to Use Your Baking Stone Like a Pro
Owning a great stone is only half the battle; using it correctly unlocks its full potential. Many home bakers make one critical mistake: not preheating long enough. Your stone needs at least 45 minutes at baking temperature—yes, even if your oven beeps that it’s “preheated” after 15 minutes. Oven thermostats measure air temperature, not surface temperature. That stone needs time to absorb and store serious heat energy.
Here’s a simple workflow that delivers consistent results:
Position early: Place your stone on the middle or lower-middle rack before turning on the oven. Starting cold prevents thermal shock.
Preheat thoroughly: Set your oven 25°F higher than your recipe calls for, then let it heat for a full 45–60 minutes. The extra heat compensates for temperature drop when you open the door.
Transfer confidently: Use a floured peel (a flat wooden paddle) to slide your proofed dough onto the stone. Quick, decisive motion prevents sticking. If dough sticks to the peel, gently shake it back and forth before transferring—don’t force it.
Create steam: For the first 10–15 minutes of baking, your loaf needs steam to develop a thin, flexible crust that allows maximum expansion. Toss 3–4 ice cubes into a preheated cast iron pan on the oven floor, or spray the oven walls (not the light!) with water using a clean spray bottle.
Rotate halfway: Ovens have hot spots. Gently rotate your loaf 180 degrees halfway through baking for even browning.
Pro tip: Keep a dedicated pizza peel just for bread baking. Lightly dust it with rice flour instead of wheat flour—rice flour’s lower gluten content prevents sticking without adding raw flour patches to your crust.
Care and Maintenance for Longevity
Treat your baking stone right, and it will reward you with years of perfect loaves. Treat it poorly, and you’ll be shopping for a replacement sooner than expected. The golden rule? Never, ever expose a hot stone to moisture or rapid cooling.
Thermal shock is the #1 cause of cracked stones. That dramatic temperature change causes different parts of the stone to expand or contract at different rates, creating internal stress that leads to cracks. This means:
- Never place cold dough with ice-cold fermentation directly on a blazing-hot stone (let refrigerated dough warm slightly first)
- Never clean a hot stone with water
- Never place a hot stone on a cold countertop or in a drafty area to cool
Cleaning is beautifully simple: after the stone cools completely, scrape off any stuck bits with a bench scraper or stiff brush. Avoid soap—it will absorb into the porous surface and transfer flavors to future loaves. Stubborn residue actually benefits your baking; that darkened patina creates a naturally non-stick surface over time. If you must deep-clean, place the stone in a cold oven, run the self-cleaning cycle, and let it cool completely inside the closed oven.
Store your stone in the oven between uses. This serves two purposes: it eliminates thermal shock risk from room-temperature storage, and the stone actually helps stabilize your oven’s temperature during regular cooking by acting as a heat buffer. Just remember it’s there before preheating for non-bread tasks!
Beyond the Stone: Complementary Tools for Crusty Success
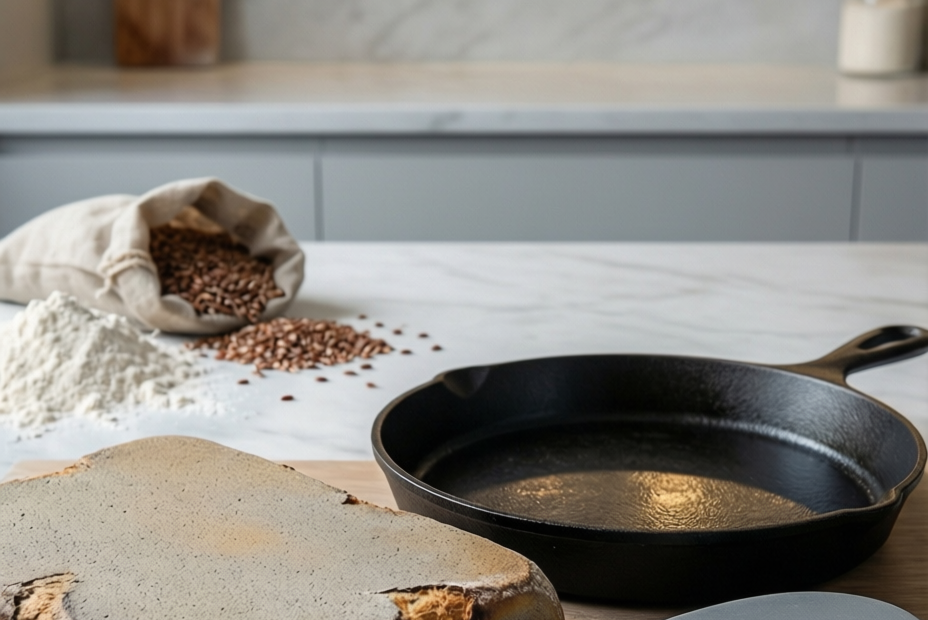
While a quality baking stone forms the foundation of great crusty bread, pairing it with a few thoughtful accessories elevates your results further. A lame (a razor-like bread scoring tool) allows precise cuts that control expansion and create beautiful ear formation. A bench scraper makes handling high-hydration doughs manageable. And a simple cast iron skillet placed on the oven floor becomes your steam generator—far more effective than spritzing water alone.
Consider your entire baking ecosystem. That stone works hardest during the first third of baking when oven spring occurs. After that initial burst, many bakers transfer loaves to a regular rack for the remainder of baking to ensure even browning on all sides. Others place a second stone on an upper rack to create a more enclosed, bakery-like environment. Experimentation within these principles—rather than rigid rules—leads to personal breakthroughs.
Remember why we chase that perfect crust: it’s not just texture. A well-developed crust carries complex flavors created by Maillard reactions and caramelization—nutty, toasty notes that plain crumb can’t deliver alone. That audible crackle as your loaf cools? That’s the sound of craftsmanship, of science and art meeting in your kitchen. It’s the sound of patience rewarded.
Conclusion
Choosing the right baking stone transforms more than just your bread—it transforms your relationship with the entire baking process. From the thermal reliability of cordierite to the thoughtful consideration of size and thickness, each decision builds toward that moment of crusty triumph. Remember the essentials: preheat thoroughly, respect thermal shock risks, and embrace steam during those critical first minutes. Your stone isn’t just equipment; it’s a partner that stores heat energy and releases it precisely when your dough needs it most.
The journey to perfect crusty loaves isn’t about expensive gadgets or secret ingredients. It’s about understanding how heat, moisture, and time interact—and using simple tools like a baking stone to guide that interaction. Every crackle, every blister, every shatter of crust tells a story of controlled transformation happening right beneath your loaf.
Your next great loaf is waiting. Slide that dough onto a properly preheated stone, create a burst of steam, and witness the magic unfold. Then slice into that golden crust, breathe in the aroma, and savor what patience and the right foundation can create.
What’s the biggest challenge you’ve faced achieving a crisp crust at home? Share your experience in the comments below—sometimes the best tips come from fellow bakers who’ve wrestled with the same stubborn loaf!
Thayná Alves is an influential digital content creator who has carved out a significant space in the realms of technology, finance, and entrepreneurship. Through her blog, Newbacker.com , she stands out as an authentic and accessible voice for individuals seeking practical information about investments, innovation, and emerging trends in the financial market.