Have you ever wondered why some homemade breads turn out fluffy and perfectly structured while others end up dense and disappointing? The secret often lies in one simple technique that separates amateur bakers from skilled artisans: the windowpane test.
This unassuming method is your gateway to understanding gluten development, ensuring your dough has reached that perfect state of elasticity and strength. Whether you’re kneading by hand or relying on a stand mixer, mastering this test will transform your bread-baking journey.
In this guide, we’ll explore everything you need to know about the windowpane test—from the science behind gluten formation to practical tips that will help you achieve bakery-quality results in your own kitchen. Get ready to elevate your baking game!
What Is the Windowpane Test and Why Does It Matter?
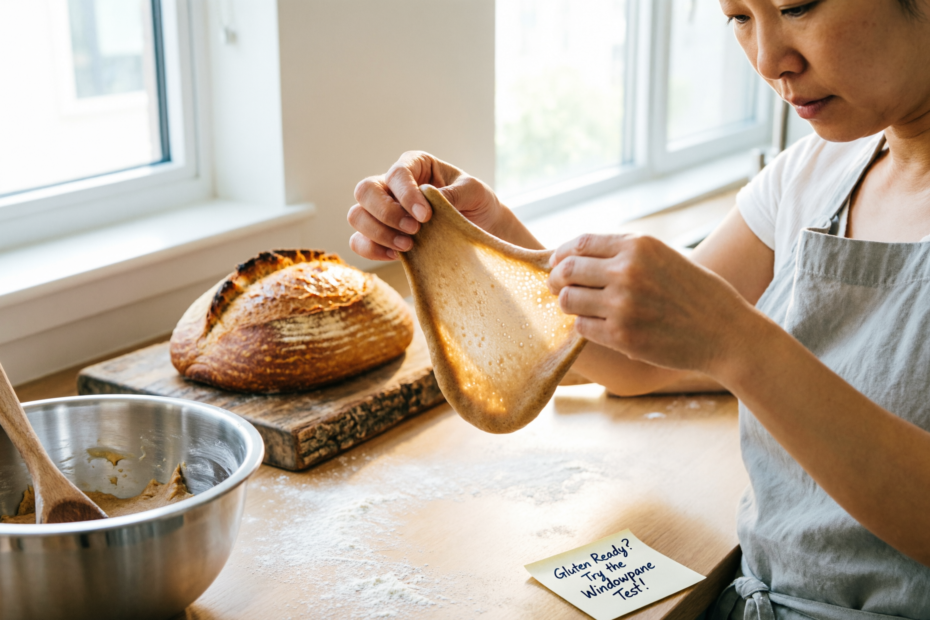
The windowpane test is a simple yet powerful technique used by bakers worldwide to determine whether their dough has developed enough gluten. But what exactly is gluten, and why should you care about it? Gluten is a network of proteins that forms when flour meets water and gets agitated through kneading. This network acts like a scaffold, trapping gas bubbles produced by yeast and giving bread its structure and chewiness.
Here’s where the windowpane test comes in: When you gently stretch a small piece of dough between your fingers, properly developed gluten will allow it to thin out into a translucent membrane without tearing—much like a windowpane. If the dough rips immediately, it needs more kneading. If it stretches beautifully, you’re ready to move forward.
Why is this so important? Underdeveloped gluten leads to bread that’s crumbly, dense, and lacks volume. Overdeveloped gluten, though less common, can make dough tough and difficult to work with. The windowpane test gives you visual and tactile confirmation that your dough is in that sweet spot. Think of it as your dough’s report card—it tells you whether you’ve put in enough work or if you need to keep going.
Professional bakers rely on this test daily, but it’s equally valuable for home bakers. Unlike timing guidelines in recipes (which can vary based on flour type, humidity, and kneading method), the windowpane test provides real-time feedback specific to your dough. It takes the guesswork out of bread-making and helps you develop an intuitive understanding of dough behavior.
How to Perform the Windowpane Test Correctly
Performing the windowpane test is straightforward, but doing it correctly requires attention to detail. Here’s a step-by-step guide to ensure you’re getting accurate results every time:
Step 1: Take a Small Sample Pinch off a piece of dough about the size of a walnut (roughly 1-2 inches in diameter). Make sure your hands are clean and lightly floured to prevent sticking.
Step 2: Shape and Stretch Gently shape the piece into a smooth ball, then use your thumbs and fingers to carefully stretch it outward. Work slowly and evenly, rotating the dough as you stretch to create uniform thinness.
Step 3: Observe the Results Hold the stretched dough up to a light source. If the gluten is properly developed, you’ll see a thin, translucent membrane that allows light to pass through without breaking. This is your windowpane. The dough should stretch to about 2-3 inches in diameter before becoming translucent.
What to Look For:
- ✓ Pass: Dough stretches thin without tearing, creating a see-through membrane
- ✗ Fail: Dough tears immediately or develops holes before becoming translucent
- ⚠️ Over-kneaded: Dough feels tough, resists stretching, or tears in a jagged pattern
Timing Matters: For most bread recipes, you’ll perform this test after 8-10 minutes of machine kneading or 12-15 minutes by hand. However, don’t rely solely on time—different flours and hydration levels affect gluten development speed.
Pro Tip: If your dough fails the test, continue kneading for 2-3 more minutes before testing again. Avoid over-testing, as excessive handling can warm the dough and affect fermentation.
Common Mistakes and How to Avoid Them
Even experienced bakers can stumble when performing the windowpane test. Understanding these common pitfalls will save you time, frustration, and potentially ruined loaves:
Mistake #1: Stretching Too Aggressively Many bakers pull the dough too hard or too quickly, causing it to tear even when gluten development is adequate. The solution? Treat your dough gently. Think of it like stretching bubble gum—you want slow, steady pressure that allows the gluten network to reveal itself naturally.
Mistake #2: Testing Too Early Impatience is the enemy of good bread. Testing before the dough has had a chance to develop gluten will naturally result in failure, leading to unnecessary additional kneading. Wait until your dough feels smooth and elastic before performing the test—usually after the initial kneading period specified in your recipe.
Mistake #3: Ignoring Dough Temperature Cold dough is stiffer and less pliable, making it harder to stretch and more likely to tear. If your kitchen is cold or you’ve used cold ingredients, your dough might fail the test even with adequate gluten development. Let cold dough rest for 5-10 minutes at room temperature before testing to allow the gluten to relax.
Mistake #4: Using the Wrong Flour Not all flours are created equal. Bread flour, with its higher protein content (12-14%), develops gluten more readily than all-purpose flour (10-12%). If you’re using low-protein flour, you might never achieve a perfect windowpane. Match your flour to your recipe and adjust expectations accordingly.
Mistake #5: Over-Kneading After Passing Once your dough passes the windowpane test, stop kneading! Continuing to work the dough can break down the gluten network you’ve just built, leading to a weak structure. Trust the test and move on to the bulk fermentation stage.
When the Windowpane Test Isn’t Enough
While the windowpane test is an invaluable tool, it’s not a one-size-fits-all solution for every baking scenario. Understanding its limitations will make you a more versatile and knowledgeable baker:
High-Hydration Doughs Artisan breads like ciabatta or focaccia often have hydration levels of 75% or higher. These wet, sticky doughs behave differently and may never form a traditional windowpane, even when properly developed. For high-hydration doughs, look for other signs: the dough should pull away from the bowl sides, feel elastic when folded, and show visible bubbles on the surface.
Enriched Doughs Brioche, challah, and other enriched doughs contain significant amounts of fat (butter, eggs, oil), which can interfere with gluten development and make the windowpane test less reliable. These doughs often require longer kneading times and may achieve readiness before forming a perfect windowpane. Instead, rely on the dough’s overall texture—it should be smooth, slightly tacky, and spring back when gently pressed.
Whole Grain and Alternative Flours Doughs made with whole wheat, rye, or gluten-free flours present unique challenges. The bran in whole grain flours can physically cut through gluten strands, making it difficult to achieve a clean windowpane. Rye flour contains different proteins that don’t form traditional gluten networks. In these cases, combine the windowpane test with other indicators like dough elasticity and volume increase.
The Bigger Picture Remember, the windowpane test is just one piece of the puzzle. Combine it with other assessment methods:
- Does the dough pass the “poke test” after fermentation?
- Has it doubled in size?
- Does it smell pleasantly yeasty?
- Does it feel airy and alive?
Experienced bakers develop a holistic understanding of dough behavior, using multiple cues rather than relying on a single test.
Building Your Gluten Development Skills
Mastering the windowpane test is more than learning a technique—it’s about developing an intuitive connection with your dough. Here’s how to build your skills and confidence:
Practice Consistently Like any skill, gluten assessment improves with repetition. Bake regularly and perform the windowpane test every time, even if you think you know the dough is ready. Keep a baking journal noting kneading times, flour types, hydration levels, and test results. Over time, patterns will emerge that help you predict gluten development.
Experiment with Different Flours Challenge yourself by working with various flour types. Try bread flour, all-purpose, whole wheat, and even ancient grains like spelt or einkorn. Each will behave differently, teaching you to adapt your technique rather than follow rigid rules. Start with 50/50 blends if you’re new to alternative flours.
Learn Alternative Kneading Methods Don’t limit yourself to traditional kneading. Explore techniques like:
- Stretch and fold: Ideal for high-hydration doughs, performed during bulk fermentation
- Slap and fold: Excellent for developing gluten quickly in wet doughs
- No-knead methods: Rely on long fermentation times for gluten development
Each method produces different results, and understanding these variations makes you a more adaptable baker.
Trust Your Senses While the windowpane test provides visual confirmation, don’t neglect what your dough tells you through touch and appearance. Developed dough feels:
- Smooth, not shaggy or rough
- Elastic, bouncing back when pressed
- Slightly tacky but not sticky
- Cohesive, holding together as a single mass
These sensory cues, combined with the windowpane test, create a complete picture of your dough’s readiness.
Learn from Failures Every failed loaf is a learning opportunity. Did your bread turn out dense? Perhaps you under-kneaded. Did it collapse during baking? Maybe you over-kneaded or over-proofed. Analyze what went wrong and adjust your approach next time. Even professional bakers encounter failures—it’s part of the journey.
Conclusion
Mastering the windowpane test is a game-changer for anyone serious about bread baking. This simple technique provides immediate, reliable feedback about your dough’s gluten development, helping you achieve consistent, bakery-quality results at home.
We’ve explored what the windowpane test is, how to perform it correctly, common mistakes to avoid, and situations where additional assessment methods are necessary. Most importantly, we’ve discussed how to build your overall gluten development skills through practice, experimentation, and sensory awareness.
Remember, great bread baking is both science and art. The windowpane test gives you the scientific data you need, but your intuition and experience will guide you toward true mastery. Don’t be discouraged if your first attempts aren’t perfect—every baker started exactly where you are now. With each loaf, you’re developing skills that will serve you for a lifetime.
Now it’s your turn to put these techniques into practice. Grab your flour, water, and yeast, and start kneading with confidence. What’s your biggest bread-baking challenge? Share your experiences, questions, or successes in the comments below—we’d love to hear about your baking journey and help you troubleshoot any issues. Happy baking, and may your windowpanes always be perfectly translucent!

Thayná Alves is an influential digital content creator who has carved out a significant space in the realms of technology, finance, and entrepreneurship. Through her blog, Newbacker.com , she stands out as an authentic and accessible voice for individuals seeking practical information about investments, innovation, and emerging trends in the financial market.