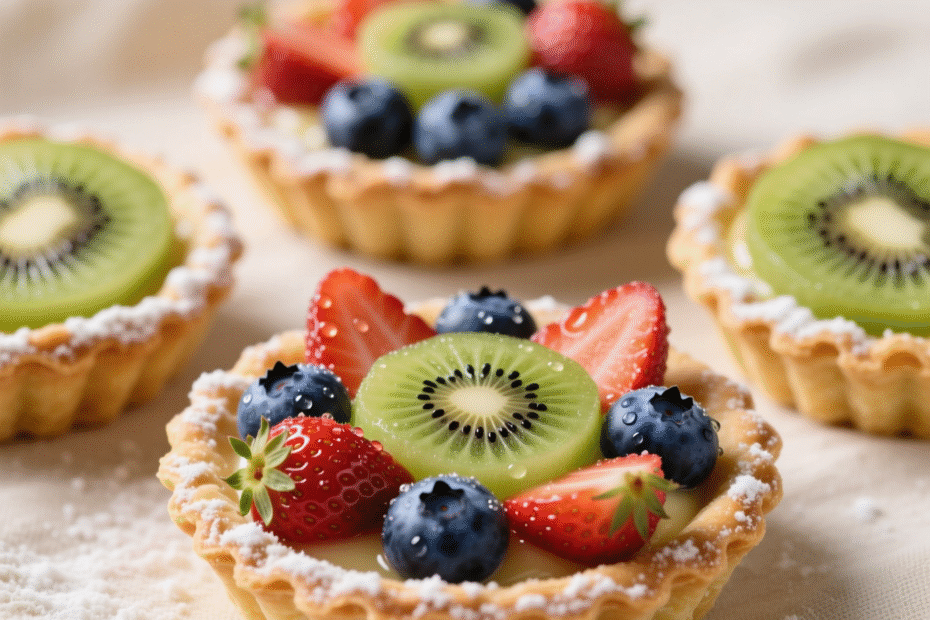
There’s something undeniably magical about biting into a perfectly crafted mini fruit tart—crisp, buttery shortcrust pastry giving way to a velvety layer of pastry cream, all crowned with jewel-toned fresh fruits that burst with flavor.
These elegant little desserts aren’t just reserved for patisseries or fancy dinner parties; with a little guidance and a dash of enthusiasm, they can become your go-to treat for everything from weekend brunches to last-minute dessert emergencies.
In this article, we’ll walk you through everything you need to know to create stunning, delicious mini fruit tarts using homemade shortcrust pastry shells. You’ll learn why shortcrust pastry is the ideal base, how to avoid common baking pitfalls, and creative ways to customize your tarts for any season or occasion.
Whether you’re a novice baker or someone looking to refine your dessert game, this guide offers practical tips, time-saving tricks, and inspiration to help you impress friends, family, or even yourself.
By the end, you’ll not only have a reliable recipe in your repertoire but also the confidence to experiment and make these tarts uniquely yours. So, tie on your apron—let’s turn simple ingredients into edible art.
Why Shortcrust Pastry Is the Perfect Base for Mini Fruit Tarts
Shortcrust pastry—known as pâte brisée in French—is the unsung hero of countless classic desserts, and for good reason. Its simple composition (flour, butter, sugar, and a touch of liquid) yields a tender, crumbly texture that contrasts beautifully with the juicy freshness of fruit and the creamy richness of fillings like crème pâtissière or mascarpone. Unlike puff pastry, which rises dramatically, shortcrust holds its shape, making it ideal for tart shells that need structure without overwhelming the palate.
What makes shortcrust especially suited for mini tarts is its versatility and stability. Mini tart shells bake quickly and evenly, and shortcrust’s low moisture content prevents sogginess—a common issue when pairing pastry with fruit. Plus, its neutral flavor acts as a blank canvas, allowing the natural sweetness and acidity of berries, stone fruits, or citrus to shine.
Historically, shortcrust has been a staple in European baking since the 17th century, prized for its ease and elegance. Today, it remains a favorite among home bakers and professionals alike because it’s forgiving, scalable, and endlessly adaptable. Want a hint of vanilla? Add a scraped pod to the dough. Prefer a nutty note? Swap 10% of the flour for finely ground almonds. These subtle tweaks personalize your tarts without complicating the process.
Most importantly, mastering shortcrust builds foundational baking skills—handling butter at the right temperature, knowing when to stop mixing, and blind-baking correctly. Once you’ve nailed these, you’ll find yourself reaching for this dough again and again, not just for tarts but for quiches, galettes, and even savory hand pies.
Step-by-Step Guide to Crafting Flawless Shortcrust Shells
Creating perfect mini tart shells begins long before the oven preheats—it starts with technique. The secret to flaky, tender shortcrust lies in keeping ingredients cold and handling the dough as little as possible. Here’s how to do it right, every time.
Start with cold ingredients. Use chilled butter straight from the fridge (or even frozen, grated on a box grater for ultra-easy incorporation). Cold butter creates steam pockets as it melts in the oven, yielding a delicate crumb. Similarly, use ice-cold water—just enough to bring the dough together without making it sticky.
Mix gently. Overworking the dough develops gluten, which leads to toughness. Pulse in a food processor or use your fingertips to rub the butter into the flour until it resembles coarse breadcrumbs. Then add water a tablespoon at a time, mixing only until the dough clumps together.
Chill before rolling. Wrap the dough in plastic and refrigerate for at least 30 minutes. This relaxes the gluten and firms up the butter, making the dough easier to roll and less likely to shrink during baking.
Roll and line with care. Roll the dough to about 1/8-inch thickness. Press it gently into mini tart pans (typically 3–4 inches in diameter), ensuring it fits snugly into the corners without stretching. Trim excess with a rolling pin rolled over the top.
Blind bake properly. Prick the base with a fork, line with parchment, and fill with pie weights or dried beans. Bake at 375°F (190°C) for 15 minutes, then remove the weights and bake 5–8 minutes more until golden. This two-step process ensures a crisp, fully cooked shell that won’t turn soggy once filled.
Pro tip: Bake shells a day ahead and store them in an airtight container. They’ll stay crisp and save you time when assembling tarts last-minute.
Choosing and Preparing the Best Fruits for Your Tarts
The beauty of mini fruit tarts lies in their seasonal adaptability. While strawberries and kiwi are classic choices, the real magic happens when you let the calendar guide your selection. In spring, think rhubarb compote or sliced apricots; summer calls for blueberries, peaches, and raspberries; autumn welcomes figs and pears; even winter shines with blood oranges or poached quince.
When selecting fruit, prioritize freshness and ripeness—but not overripeness. Overly soft fruits release too much juice, compromising the pastry’s crispness. Wash and dry berries thoroughly; pat stone fruits dry after slicing. For fruits prone to browning (like apples or bananas), toss them in a bit of lemon juice to preserve color and add brightness.
Presentation matters. Arrange fruits in concentric circles, alternating colors for visual appeal. A single large slice of mango or a fan of kiwi can look just as striking as a mosaic of berries. And don’t forget texture—adding a sprinkle of toasted coconut, crushed pistachios, or edible flowers elevates both flavor and aesthetics.
To enhance flavor without masking it, consider a light glaze. Melt a tablespoon of apricot jam with a splash of water, then brush it over the fruit. This adds shine and a subtle sweetness while sealing in moisture. Alternatively, a dusting of powdered sugar or a drizzle of honey just before serving offers a finishing touch that feels both simple and sophisticated.
Remember: less is often more. Let the fruit be the star—your tart should taste fresh, vibrant, and balanced, not overly sweet or cluttered.
Creative Filling Ideas Beyond Pastry Cream
While classic vanilla pastry cream is a beloved foundation, don’t be afraid to explore other fillings that complement your fruit choices and surprise your guests. The right filling can transform a simple tart into a memorable experience.
Mascarpone-lime blend: Mix mascarpone cheese with a touch of powdered sugar and freshly grated lime zest. Light, tangy, and creamy, it pairs beautifully with berries or tropical fruits like mango and passionfruit.
Greek yogurt & honey: For a lighter option, use thick Greek yogurt sweetened with local honey and a hint of vanilla. It’s protein-rich, subtly sweet, and works wonderfully with stone fruits or figs.
White chocolate ganache: Heat heavy cream and pour it over chopped white chocolate; stir until smooth. Once cooled slightly, spread into shells before adding fruit. This decadent base shines with tart fruits like raspberries or blackberries, creating a perfect sweet-tart balance.
Coconut cream: Chill a can of full-fat coconut milk overnight, then scoop out the solid cream and whip it with a bit of maple syrup. This dairy-free option is ideal for vegan tarts and pairs exquisitely with pineapple, kiwi, or dragon fruit.
Frangipane (almond cream): A French favorite, frangipane is made from ground almonds, butter, sugar, and eggs. Bake it directly in the shell until puffed and golden, then top with sliced pears or plums. It’s rich, nutty, and perfect for autumnal tarts.
Each of these fillings offers a unique texture and flavor profile, allowing you to tailor your tarts to dietary preferences, seasonal availability, or simply your mood. Experimenting with fillings also makes baking more fun—each batch can tell a different story.
Make-Ahead Tips and Storage Solutions for Stress-Free Entertaining
One of the greatest advantages of mini fruit tarts is their adaptability to make-ahead preparation—essential for hosts who want to enjoy their own gatherings without last-minute kitchen chaos. With smart planning, you can assemble components days in advance and finish tarts just before serving.
Pastry shells: Bake and cool completely, then store in an airtight container at room temperature for up to 3 days or freeze for up to 1 month. If frozen, thaw at room temperature and refresh in a 300°F (150°C) oven for 5 minutes to restore crispness.
Fillings: Pastry cream keeps well in the fridge for 2–3 days (press plastic wrap directly on the surface to prevent a skin). Mascarpone or yogurt mixtures should be used within 24 hours. Ganache and frangipane can be prepared ahead and stored chilled, then brought to room temperature before spreading.
Fruit: Wash and slice fruits the morning of serving, but avoid assembling too early. Berries can be prepped 2–3 hours ahead if patted very dry; tropical fruits like mango hold up well for 4–5 hours. To prevent browning, keep cut fruits in airtight containers with a paper towel to absorb excess moisture.
Final assembly: Fill shells no more than 1–2 hours before serving to maintain pastry crispness. If you must assemble earlier, place tarts on a wire rack (not a plate) to allow air circulation underneath, which slows sogginess.
For parties, consider a “tart bar” setup: display empty shells, fillings in small bowls, and a variety of fruits. Let guests build their own—interactive, fun, and ensures everyone gets their favorite combination.
Conclusion
Mini fruit tarts with shortcrust pastry shells are more than just a dessert—they’re a celebration of simplicity, seasonality, and skill. From the buttery crunch of a perfectly baked shell to the bright pop of fresh fruit, every bite offers balance and delight.
Throughout this article, we’ve explored why shortcrust pastry is the ideal foundation, how to master its preparation, and ways to elevate your tarts with thoughtful fruit pairings and creative fillings. We’ve also shared practical make-ahead strategies to make baking stress-free and even social.
These tarts are a testament to the idea that elegance doesn’t require complexity. With a few quality ingredients and a little patience, you can create desserts that rival those from high-end patisseries—all from your own kitchen. More importantly, they invite you to connect with the rhythm of the seasons, to experiment, and to share joy through food.
So, the next time you’re looking for a dessert that’s both impressive and approachable, reach for your rolling pin and a basket of fresh fruit. Your future self—and your guests—will thank you.
Now it’s your turn: What’s your favorite fruit combination for tarts? Have you ever tried a savory twist on shortcrust shells? Share your ideas, questions, or baking triumphs in the comments below—we’d love to hear from you! And if you found this guide helpful, don’t forget to share it with a fellow baker who’d appreciate it. Happy baking!

Thayná Alves is an influential digital content creator who has carved out a significant space in the realms of technology, finance, and entrepreneurship. Through her blog, Newbacker.com , she stands out as an authentic and accessible voice for individuals seeking practical information about investments, innovation, and emerging trends in the financial market.