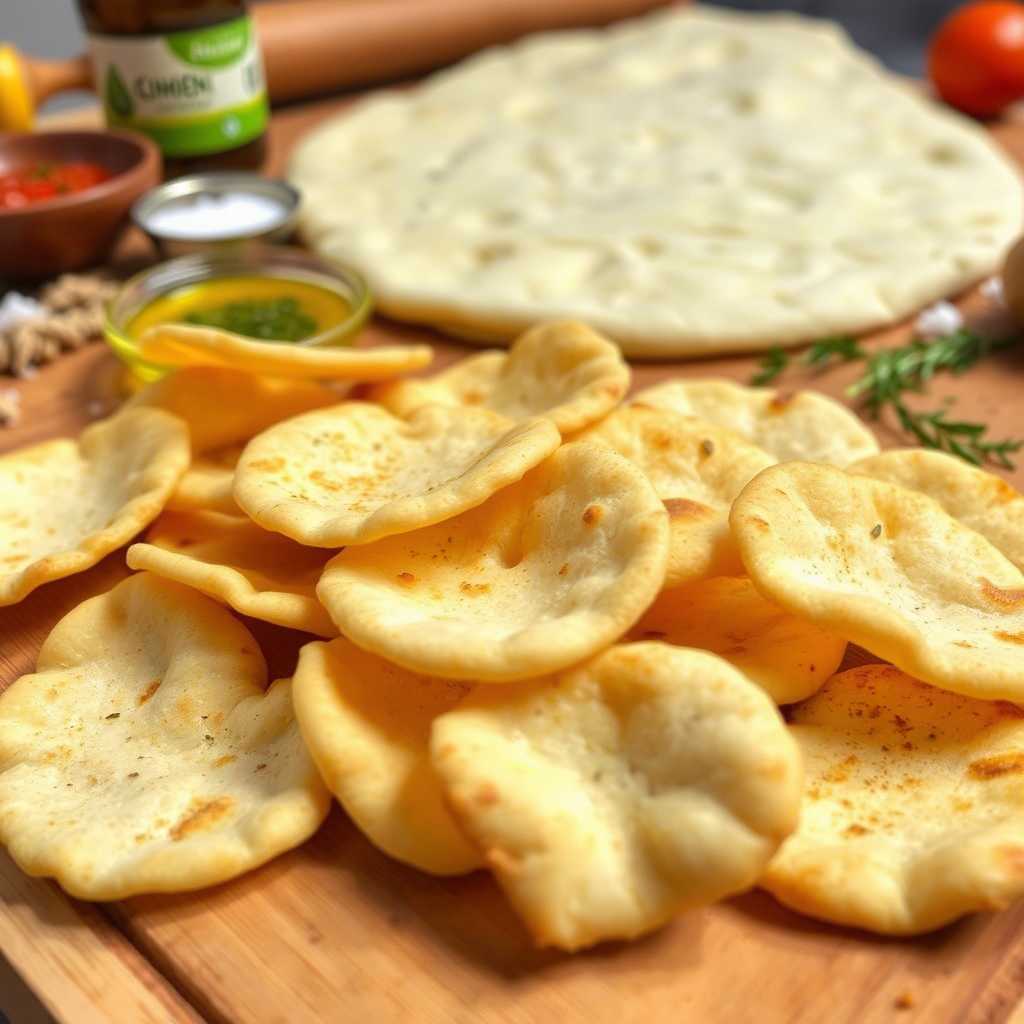
Imagine this: you’ve just made a fresh batch of homemade pita bread for dinner. The aroma fills your kitchen, and everyone’s excited to dig in. But there’s one problem — you have leftover dough. What do you do with it? Toss it out? Let it sit forgotten in the fridge until it hardens?
Here’s a better idea: turn that extra dough into crispy, golden pita chips — the perfect snack or side for dips, salads, or even soups. It’s an easy, zero-waste solution that adds flavor, texture, and fun to your meals without any extra effort. Whether you’re looking to use up leftovers or simply want a healthier alternative to store-bought snacks, this homemade pita chips recipe is your new go-to.
In this article, we’ll walk you through everything you need to know to make delicious, restaurant-quality pita chips at home. From ingredients and baking tips to creative flavor ideas and storage tricks, this guide will help you transform ordinary dough into something truly special. Ready to crunch into something new?
Why You Should Make Your Own Pita Chips
There are countless reasons why making your own pita chips is worth the small effort. First and foremost, it’s a fantastic way to reduce food waste. Instead of throwing away unused dough or letting half-eaten pitas dry out on the counter, you can repurpose them into something tasty and versatile.
Another major benefit? Control over ingredients . Store-bought pita chips often come packed with preservatives, sodium, and unnecessary additives. When you make them at home, you decide what goes in — from the type of flour to the seasoning. This makes them a healthier option, especially if you’re watching your salt intake or avoiding artificial flavors.
Plus, homemade pita chips are incredibly customizable. Want a smoky twist? Add smoked paprika. Feeling spicy? A dash of chili flakes does wonders. You can even experiment with herbs like rosemary or thyme for a gourmet touch. With so many possibilities, you’ll never run out of ways to keep your snack game fresh.
And let’s not forget the cost factor. Making your own pita chips is significantly cheaper than buying pre-packaged versions, especially if you already have pita bread or dough on hand. It’s a budget-friendly snack that doesn’t compromise on taste.
Step-by-Step Guide to Perfect Homemade Pita Chips
Now that you’re convinced (we hope!), let’s dive into how to make these crunchy delights. Don’t worry — you don’t need fancy equipment or hours in the kitchen. In fact, this recipe takes less than 30 minutes from start to finish, including baking time.
Ingredients:
- 4–6 whole wheat or white pita breads (or leftover dough rolled out thinly)
- 2–3 tablespoons olive oil
- Salt to taste
- Optional seasonings: garlic powder, paprika, chili flakes, dried herbs, lemon zest, etc.
Instructions:
Preheat your oven to 375°F (190°C).
Cut the pita breads into wedges — like slices of pizza — or tear them into irregular pieces for a more rustic look.
Place the pieces on a baking sheet lined with parchment paper to prevent sticking.
Brush both sides lightly with olive oil . Be careful not to oversaturate — too much oil can make the chips greasy instead of crisp.
Sprinkle with salt and any other seasonings you like. Mix and match flavors to suit your mood or pair with different dips.
Bake for 10–15 minutes , flipping halfway through, until golden brown and crispy. Keep a close eye on them toward the end to avoid burning.
Let cool completely before serving or storing. They’ll get even crispier as they cool down.
That’s it! These pita chips are ready to enjoy straight out of the oven or stored for later snacking.
💡 Pro Tip: For extra crispiness, bake the chips on a wire rack instead of directly on the baking sheet. This allows air to circulate evenly around each piece.
Creative Flavor Ideas to Elevance Your Pita Chips
Once you’ve mastered the basic recipe, it’s time to have some fun with flavors. Here are a few exciting combinations that will elevate your homemade pita chips from simple to sensational:
Garlic Parmesan Twist
Brush the pita wedges with olive oil infused with minced garlic. Sprinkle grated Parmesan cheese and a pinch of black pepper before baking. Serve with marinara sauce or ranch dip.
Mediterranean Magic
Mix dried oregano, basil, and thyme with olive oil before brushing onto the pita pieces. After baking, drizzle with a bit of balsamic glaze for a tangy finish.
Spicy Southwest Kick
Combine chili powder, cumin, smoked paprika, and a little cayenne pepper. Sprinkle generously over the chips before baking. Pair with guacamole or salsa for a fiesta in your mouth!
Lemon & Herb Zing
Zest a lemon directly over the chips and mix with a touch of lemon juice and olive oil. Sprinkle with chopped fresh parsley or chives after baking for a refreshing burst of flavor.
Sweet Cinnamon Sugar Treat
Yes, you read that right — sweet pita chips are a thing! Brush the pita with melted butter, then sprinkle with a mixture of cinnamon and sugar. Bake until golden and serve with yogurt or chocolate dipping sauce.
These variations show just how versatile homemade pita chips can be. Experiment with your favorite spices and see which ones become family favorites.
Storage Tips to Keep Your Pita Chips Fresh Longer
One of the best things about homemade pita chips is that they last longer than you might expect — as long as you store them properly. Here are some handy tips to keep your chips crispy and flavorful for days.
Cool Completely Before Storing
This step is crucial. If you pack the chips while they’re still warm, moisture can build up inside the container, turning your perfectly crisp snacks into soggy disappointments.
Use an Airtight Container
Once cooled, transfer the chips to an airtight container or resealable bag. To absorb any residual moisture, add a small packet of silica gel (the kind you find in vitamin bottles) or a folded-up paper towel.
Re-Crisp in the Oven
If your chips lose their crunch after a day or two, don’t toss them! Simply spread them on a baking sheet and reheat in a 300°F (150°C) oven for 5–10 minutes. They’ll regain their crispness in no time.
Make Ahead for Parties
Pita chips are great for meal prep or entertaining. You can make a big batch ahead of time and store them for up to a week. Just remember to add any fresh herbs or garnishes right before serving to maintain their vibrant color and flavor.
By following these simple storage tricks, you’ll always have a stash of healthy, homemade snacks ready when cravings hit.
How Pita Chips Fit Into a Healthier Lifestyle
Snacking doesn’t have to mean compromising your health goals — especially when you make your own pita chips. Compared to many commercial snacks, homemade versions offer a range of nutritional benefits.
For starters, whole grain pita bread contains fiber, which helps keep you full longer and supports digestive health. When baked instead of fried, pita chips are low in fat and calories, making them a guilt-free treat when enjoyed in moderation.
They also provide a good source of carbohydrates for energy, along with small amounts of protein and essential minerals like iron and magnesium. By choosing whole wheat pitas and using heart-healthy olive oil, you can further boost the nutritional value of your chips.
Unlike processed snacks, homemade pita chips contain no artificial preservatives, trans fats, or excessive sodium. That means you’re feeding your body real food — and your taste buds — at the same time.
So whether you’re trying to eat cleaner, watch your weight, or simply enjoy smarter snacking, pita chips are a smart addition to your daily routine. And the best part? You control exactly what goes into them.
Final Thoughts: Crunch Into Something New
Homemade pita chips are more than just a clever way to use up leftover dough — they’re a gateway to mindful eating, creativity in the kitchen, and reducing food waste. With just a few simple steps, you can turn what would otherwise be discarded into a delicious, satisfying snack.
From experimenting with bold flavors to mastering the perfect crunch, making pita chips is a rewarding experience that anyone can enjoy. Plus, it’s a great opportunity to involve kids in the kitchen or impress guests with a homemade touch.
So next time you find yourself with extra dough or stale pitas, don’t throw them away. Grab a tray, preheat your oven, and get ready to enjoy something fresh, crunchy, and uniquely yours.
Remember, the joy of cooking comes from exploring, creating, and savoring every bite — and now you have one more reason to love your leftovers.

Thayná Alves is an influential digital content creator who has carved out a significant space in the realms of technology, finance, and entrepreneurship. Through her blog, Newbacker.com , she stands out as an authentic and accessible voice for individuals seeking practical information about investments, innovation, and emerging trends in the financial market.